使用官方脚本搭建V2Ray+Cloudflare服务端图文教程
-
请填写你的广告代码,或者删除本行文字。
准备工作:
关闭Centos防火墙,防火墙和端口开放是两个概念,不要混为一谈
1) 临时生效,重启后复原
开启:service iptables start
关闭:
service iptables stop
2) 永久性生效,重启后不会复原
开启:chkconfig iptables on
关闭:
chkconfig iptables off
centos 7:
systemctl stop firewalld.service #停止
systemctl disable firewalld.service #禁用
Step1:解析域名
去cloudflare注册个账号,然后在这里登录
https://cloudflare.codepearl.cn/?action=add
然后添加一个域名(如233.com),添加完成后再添加一个你想做成v2的域名,如v2.233.com,解析到你被抢的小鸡ip,此时不要开启cf加速(直接通过域名——>小鸡)。
Step2:安装V2ray
找个代理登录小鸡,输入官方脚本安装:bash <(curl -L -s https://install.direct/go.sh)
Step3:配置websocket
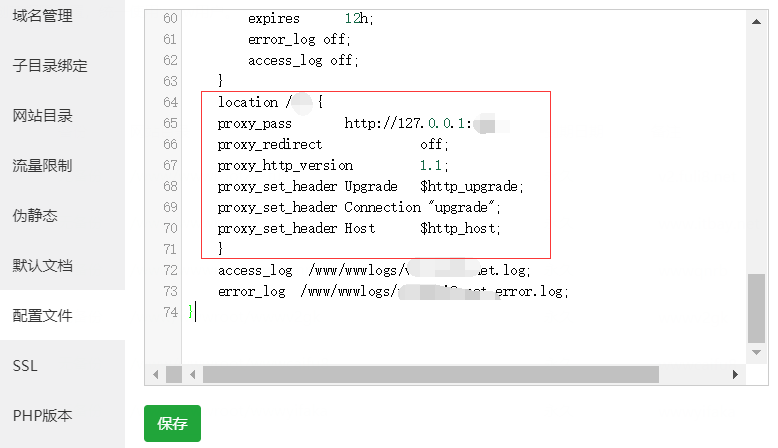
nginx配置添加一个location
location /目录 {
    proxy_pass       http://127.0.0.1:端口;
    proxy_redirect             off;
    proxy_http_version         1.1;
    proxy_set_header Upgrade   $http_upgrade;
    proxy_set_header Connection "upgrade";
    proxy_set_header Host      $http_host;
    }
Step4:配置v2ray服务端以及设置域名等
vi /etc/v2ray/config.json{ "log": { "access": "/var/log/v2ray/access.log", "error": "/var/log/v2ray/error.log" }, "inbounds": [ { "port": 445, "listen":"127.0.0.1", "protocol": "vmess", "settings": { "clients": [ { "id": "你的UUID", "alterId": 64 } ] }, "streamSettings": { "network": "ws", "wsSettings": { "path": "/你的目录" } } } ], "outbounds": [ { "protocol": "freedom", "settings": {} } ] }在线UUID生成:https://www.uuidgenerator.net ,1 UUID就行了!也可以用v2rayN客户端生成
修改后重启生效
service v2ray restart
然后可以开启那个Cloudflare的云proxy status了,并且Cloudflare的Firewall Rules不要把自己屏蔽了
安装完毕
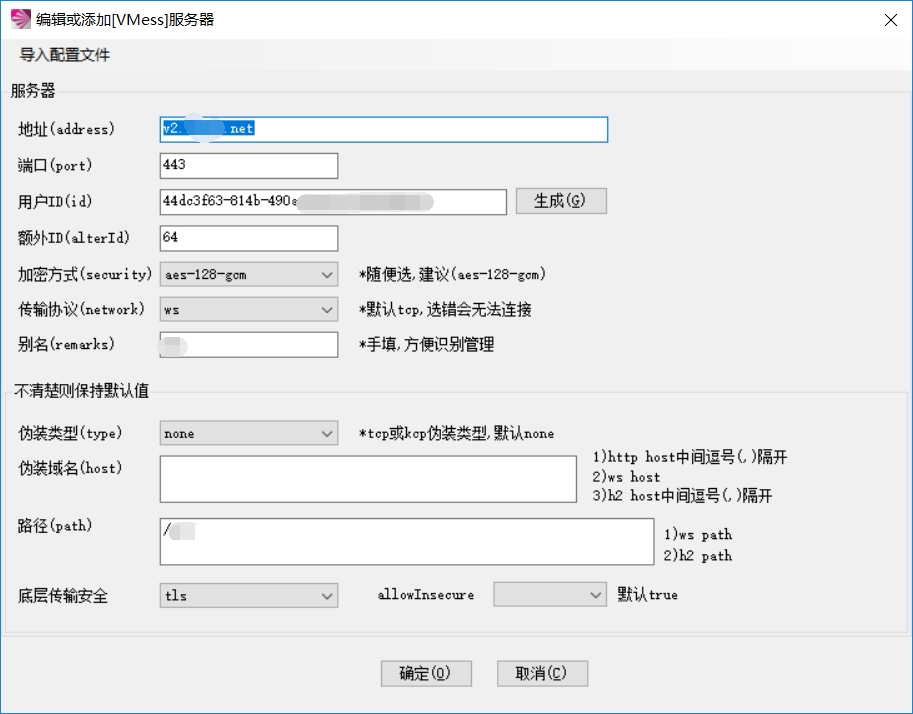
下面是客户端配置:

推荐阅读
请填写你的广告代码,或者删除本行文字。
文章标签:
版权声明: 本文除特别说明外均由 超级火箭 原创
本文链接: https://superrocket.net/v2ray/5.html,尊重共享,欢迎转载,请自觉添加本文链接,谢谢!
分享本文: 请填写您的分享代码。
呃 本文暂时没人评论 来添加一个吧
发表评论